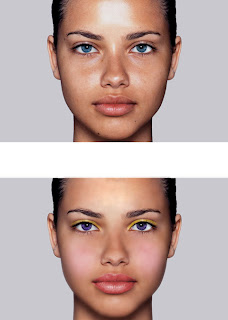
Friday, July 30, 2010

Dear Old Grandfather


-Grandfather

-This assignment involved coloring and restoring an old photograph.

- The final product would be a colored picture with no folds, dust, or scratches.

- For this assignment I used Adobe Photoshop.

-First, I fixed the fold down the center with the clone tool and the dust and scratches with the history brush and dust and scratches filter. I also had to fix one of they eyes, I didi this by copying the eye on the left hand side and pasting it on the right. Then I selected each of the sections of the picture with the quick mask tool saving each one separately and coloring them.

-I felt I did a great job taking out the crease and though there every thing was brown I did a good job with the colors aswell.


-Family

-This assignment involved fixing an old photograph.

-The final product would be a completely restored family photo.

-I used photo shop for this assignment.

-The first step in restoring this photo was removing the tape on top and bottom without destroying any of the photo itself, for this I used both healing brushes. Then I blurred the picture using dust and scratches, took a snapshot , and used the snap shot as the base for the history brush. Because the blurred picture had no dust and scratches, every part of the original I replaced with the blur would not have blemishes. I used this technique to remove al of the dust and scratches. Finally I replaced the nose Of the man on the far right with the other man's because of the damage to the existing nose.

-I did a good job going over the dust and scratches and the nose replacement was awesome, but the bottom tape did not come out very well.

Wednesday, July 28, 2010

Girl


-Flawless Skin

-The assignment was to fix the girl's complexion, then change the color of the eyes, add eye liner, lipstick, and blush.

-The final product was a before (on top) and after (below) of a retouched picture. The after picture depicts the girl with flawless skin.

-I used Adobe Photoshop for all of this assignment.

-To give the girl flawless skin I first used the spot healing brush tool to remove any blemishes from her face, then I used the healing brush tool to remove the glare from here face. I then saved the background as a selection. After that I copied the girl layer and called it blur. I then used gaussian blur to blur her entire face.I used the eraser tool to get rid of any blur on the detailed parts of the face, like the hair, eyes, ears, lips, nose, and eyebrows. I then lowered the opacity on the blur layer to 65 percent. After this I loaded the selection of the background I had saved earlier, this fixed the crisp edge around her face that the blur had ruined. She finally had flawless skin so I began to apply make-up. I changed and intensified her eye color first, though not actually make-up this was part of assignment, I used the quick mask mode with the paint brush to select the entire iris and used hue and saturation to make her eyes purple. then I made a new hue and saturation adjustment layer which I made a yellow color. I then filled the layer with black and used the paint brush to paint the eye make-up on. I did the same for the blush though the color I used for that was pink and the brush was bigger with less hardness. Finally I used quick mask and the paint brush to select the lips and create a new adjustment layer, with hue and saturation I changed the color.

-Every step worked out well for me on this project except for the glare removal, though I did remove the most intense part of the white I made the forehead overall lighter than the original picture, and as I tried to darken it with the healing brush tool I seemed to just be spreading the white around.

Tuesday, July 27, 2010

Travelco: Travel Company Photoshop Ad


-Travel Agency Annual

-This assignment involved cropping and adding to background pictures then bringing in two other photoshopped pictures.

-The final product would be a full color annual for a travel agency.

-For this assignment I used Adobe Photoshop.

-First I removed the damaged parts of this photograph, then I added a small portion of sky using the gradient tool. The next step was bring in other objects like the blimp and plane that I had previously used quick mask and the paint brush to mask out of other pictures. After Placing the objects where I felt they fits I used a transparent to black gradient to make them blend into the sky. Then I created my type and added effects.

-I was pleased with the look of the final product. I was especially surprised by the quality of the sky addition.

Nexto: Photoshop Ad


-Nexto

-This assignment involved cropping and adding to an existing background photo then seamlessly adding in other pictures.

-The final product would be an annual for a company called Nexto.

-For this project I used Adobe Photoshop.

-The first step was to crop out the ruined part of the background, then change the canvas size and add sky using the eyedropper and gradient tools. In the added sky I placed pictures that I had previously masked out of their original photographs using quick mask and the paint brush tool. After placing them in their own layers I used a transparent to black gradient to make them blend into the sky. To finish the assignment I added the company name with an effect.

-This Project went well I was especially impressed with the added segment of sky.

Birthday Card: Photoshop


-Birthday Card

-This assignment involved finding a picture from the internet and making it into a birthday Invitation.

-The final Product would be a birthday invitation.

-I used Photo shop for this assignment.

- The first step was planning my design in a dummy. Then when I opened the picture in photoshop I changed the canvas size to match that of my dummy. I centered my picture while doing this. I then added the type, choosing my font and size. To finish I added an inside stroke and printed.

-This was most likely my worst work in this class, I made a very boring design. I was also disappointed to find out that my picture would not fit the page I was printing on because printers do not print the full 8.5x11.

Commodities to Culture: Photoshop


-Commodities to Culture

-This assignment involved masking around objects in a picture to be placed in this university's advertisment.

-The final product would be a design university's advertisment.

-For this assignment I used Adobe Photoshop.

-First I made thumbnails for the ad then I created a rough. When I finished those I set up my ad's squares in photoshop and looked for suitable pictures on the internet to place in my ad, one by one I pulled each one outof its original picture, using every type of masking tool, placing it into a square on the page. I finished by adding and arranging the text and printing.

-I was pleaseed with the maskings I did, every picture had a clean edge.

Zoo Postcard


-Zoo Postcard

-Thyis assignment involved placing text and cropped pictures in photoshop.

-The fianl product woulod be a postcard from the zoo.

-For this assignment I used Adobe Photoshop.

-The first step was to go through each photo that would be added and crop it appropraitly then add a stroke. Next I brought each picture into the final postcard which I also put a stroke, after that I placed and changed the pre-writen text.

-The colors I chose for the stroke and text were, in my opinion very nice. I do think that the postcard is almost boring, I wish I could fix that.

Animation Magazine Cover


-Animation Magazine Cover

-This project involved scaning and using the pen tool to outline the scan.

-The final product would be a game magazine cover.

-For this assignment I used Adobe Illustrator.

-The first step was drawing a character for the cover and creating thumbnails. Then I scanned the picture and traced around the entire thing cutting out pieces for each colored section. Then I copied the character onto a 7x10 document that would be the cover. To that I added text and a Bar code.

-This assignment was one of my favorites. I thought my character was awesome and my teasers included many inside jokes.

Marbled Paper Notepad


-Marbled Paper Notepad

-This assignment involved marbling paper to cover a cardboard covered paper notepad

-The final product would be a marbled paper notepad.

-No software was used for this project.

-The first step in creating this notepad was marbling the paper, I then, when the paper was dry cut my paper to fit the cardboard cover, then I glued the paper down to the cardboard. After letting the glue dry I chose a stack of paper to fit in the middle of each cover, stacked everything up, and drilled two holes over the binding. I use two screw-bindings to hold the notepad together.

-My notepad making experience went well except for when I was marbling the paper. The green ink seemed to be dried out and it clumped together on the paper. My final product had a few big green spots on the cover.

Monster


-Monster

-The plan for this assignment was to place existing pictures and type into an already existing template.

-The final product would be a monster ad.

-For this assignment I used Adobe InDesign.

-First I made all of the frames for the type and pictures in the template, then I imported the monster picture into the four boxes and the text into the rest. The next step was to change all of the type to the specified fonts, and sizes. The last step was adding the wavy line and the star adding drop shadows o each of them.

-I was pleased with the final product, I was very happy to have discovered how to make the star shape.

Black Square Book


-Black Square Project

-This assignment involved using four black squares of equal size to describe six words; congestion, playful, bold, tension, order, and increase; on a square canvas, then making a book showcasing the art.

-The final product would be a book with six pages of art.

-I used Adobe Illustrator to make all of the art and InDesign to put together and print the book.

-First I made thumbnails for my art and then created a dummy. After picking the thumbnails I liked I recreated them in Illustrator, then brought them into in design. In InDesign I arranged the pages and created an about the creator page. I then printed the book and stitched it.

-This assignment went well for me I thought my art work really depicted the words from the assignment.

Friday, July 16, 2010

2010 World Cup Soccer Ad


-Symbol project

-The goal of this assignment was to use symbols and other Illustrator tools to create and ad.

-The final product would be an ad for world cup soccer.

-For this project I used Illustrator To create the art work and InDesign to add the body copy.

-The first step was creating thumbnails and a rough. Then I created the art work, this involved creating layers for every object in the art work, then I added the heading and subheading. Finally I moved it to InDesign where I added a body copy of Lorem Ipsum and printed.

-I thought my design fit the given heading very well though I thought the overall ad was too busy.

Notepad For Dad

MY Notepad


-Notepad

-The assignment involved creating a notepad on the computer then printing out 50 pages to be bound together using padding compound. I was able to choose the size my notepad were as long as they fit on an 8.5x11 piece of paper.

-The final product for this assignment was at least one padded notepad.

-I used Adobe Illustrator for all of this project.

-After deciding that I wanted to split the page in half and make two different notepads I opened a new 8.5x11 document and started designing my notepads. I had to create a design that fit in side half inch margins and did not use up to much ink. After finishing the designs I printed fifty pages using the laser printer then padded the paper together applying padding compound three times once every fifteen minutes.

-The design stage for this project went well, I designed one for me and one for my dad. When I got to the padding segment of the assignment I put the padding compound on too wet and had to let it dry over the weekend. Then when I finished the pads I realized that the one I had made for my Father had been made upside down, thankfully only one was needed for grading.

Congestion

Playful

Order

Increase

Tension

Bold

Wednesday, July 14, 2010


-Type specification

-

-This assignment involved accurately recreating a worksheet given to us in class. This work sheet had different types and sizes of font.

-The final product would line up with the original worksheet on a light table.

-I used Adobe Illustrator for this project.

- I first measured each font and decided if it was san serif or serif, then I went onto the computer and typed in the text applying any observations and measurements I made. The last two segments of font on the page already had the measurements, all I did was apply the given information.

-Though I got full credit for this assignment I was disappointed when I discovered I had spelled a word incorrectly.